The React way of dynamically updating a website’s content is different from Vanilla JavaScript. In JavaScript, we do it by directly manipulating DOM whereas in React we have a feature called useState(Functional Component). It is one of the built-in hooks in React. It helps us to declare state variables in Functional Components.
We pass the initial state to the useState hook and in return it gives us a variable with our state value and a function to update the value.
Now let’s compare both ways (JavaScript and React) with an example.
Suppose you’ve been given a bag filled with 5 apples and after some time you are given 7 more apples to put into your bag, now how many apples will you have in your bag?
It's 5+7=12 right?
Let’s see how we can show this example in both JavaScript and React:
The JavaScript Way
I’ve created this repl.it HTML/CSS/JS code template to show this example live, you can access it here.
HTML
<!DOCTYPE html>
<html>
 <head>
   <meta charset="utf-8">
   <meta name="viewport" content="width=device-width">
   <title>replit</title>
   <link href="style.css" rel="stylesheet" type="text/css" />
 </head>
 <body>
   <div>
     <p>Apples</p>
     <p class="value">5</p>
     <button>Update values</button>
   </div>
   <script src="script.js"></script>
 </body>
</html>
JavaScript
const value = document.querySelector('.value')
const button = document.querySelector('button')

let realValue = parseInt(value.innerHTML)
let updateValue = () => {
 realValue+=7
 return value.innerHTML = realValue
}
button.addEventListener('click', updateValue)
Code Explanation
We’ve created two HTML paragraphs - ‘apples and 5’, added a class called value to 5 to update it later, and created a button called ‘Update values’.
In our JavaScript code, We stored the ‘value’ class and the button into 2 different variables.
Next we used
parseInt()function to convert the value of our apples into integers and store it into another variable called ‘realValue’.Then we created a function called ‘updateValue’, inside which we first added 7 to the current value of the ‘realValue’ variable and assigned this updated ‘realValue’ to the HTML value of our ‘value’ variable with the help of ‘.innerHTML’.
Finally we added the click event listener to our button to call the ‘updateValue’ function every time the button gets clicked.
The React Way - useState()
Check out the repl of the same app created with React, here
App.js
import React, {useState} from 'react';
import './App.css';

function App() {

 const [apples, setApples] = useState(5)
 const updateApples = () => {
   return setApples(apples+7)
 }
 return (
   <div>
     <p>Apples</p>
     <p>{apples}</p>
     <button onClick={updateApples}>Update Apples</button>
   </div>
 );
}export default App;
Code Explanation
We start with importing React and useState from React.
const [apples, setApples] = useState(5)
The snippet above is the standard way of declaring useState. Here useState gives us a variable called ‘apples’ with the value of 5 as initialized under useState function call and another function called
setApplesto update the value of apples variable.Next we declared a function called
updateAppleswhich will be called every time someone clicks our ‘Update Apples’ button which is yet to be declared.
return setApples(apples+7)
In the above snippet, we return
setApples()function call and add 7 to the apples variable as an argument. This is how the state is updated in useState.
return (
   <div>
     <p>Apples</p>
     <p>{apples}</p>
     <button onClick={updateApples}>Update Apples</button>
   </div>
 );
}
Now finally we made our return statement. We returned a
<div>element with 2 paragraph elements, one for ‘Apples’ and one for value of apples similar to how we did this in the JavaScript version. The twist here is that instead of directly writing the value, we used the apples variable from the useState() hook to declare the value of apples.And at last we created a button and attached the updateApples function we declared earlier to the onClick event handler.
Up to this point in the article, we have learned useState() hook, how it works and compared it with DOM manipulation in Vanilla JavaScript. Now before ending this article, we’ll build a Counter App which is the classic example of useState() and React.
Counter App with useState()
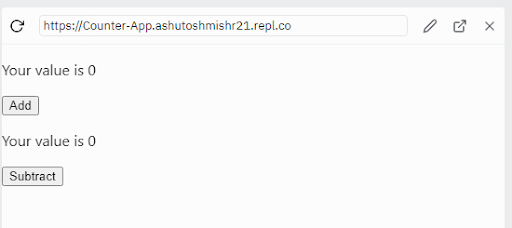
Before starting, if you want to know how this app will work, you can check out this repl.

Code
import React, {useState} from 'react';
import './App.css';

function App() {

 const [addCount, setAddCount] = useState(0);
 const [subtractCount, setSubtractCount] = useState(0);

 return (
   <div>
     <p>Your value is {addCount}</p>
     <button onClick={() => setAddCount(addCount + 1)}>
       Add
     </button>

     <p>Your value is {subtractCount}</p>
     <button onClick={() => setSubtractCount(subtractCount - 1)}>
       Subtract
     </button>
   </div>
 );
}
export default App;
Explanation
In our App() function we declared 2 useState() hooks, one for adding up the values in the counter and the other one for subtracting the values as you can see in their names. Both useStates are initialised with the value of 0.
The return statement returns a
<div>element with two<p>elements and two<button>elements for ouraddCountandsubtractCountvariables.Both paragraphs show ‘Your value is’ as a default text followed by their respective state variables, i.e.,
addCountandsubtractCount. These state variables display their current value on the screen.Then there are two buttons which call their respective setAddCount() and setSubtractCount() functions to add or subtract values from our state variables.
Great, now both the Update Apple and Counter App are finished and I hope you would have understood by now what useState hook is and how it works. If yes, show your love by sharing your thoughts and the article on social media. Happy Coding ✌️


